My k8s journey continues... Part II

Well, I worked as:
- Technical Consultant
- Developer
- Build Engineer
- Release Manager
- DevOps Engineer/Consultant
- System Integrator
- Scrum Master/Agile Coach
- Technical Project Lead
... In the last part, you could read about the beginning of my k8s journey. The rescue of my Monitor Raspberry Pi, and the build of my 5 Raspberry Pi k8s cluster. Also the basic setup with DietPi OS.
In part II, I want to show how I did the k8s setup and solved a problem on the way.
The k8s setup
Since I'm a fan of k3sup (spoken like ketchup), which was written by Alex Ellis and I used it for the setup of my previous k3s cluster I used for almost a year. So it was an easy choice to use k3sup again for the new cluster.
The Pi's had an OS (DietPi), an NFS mount (done with dietpi-drive_manager) and a custom node_exporter (rpi_exporter by Ryan Amstrong) for prometheus data collection.
As IP's I used the static 192.168.0.50 and up. I used this range since I configured the DHCP to end dynamic IP's at x.x.x.49. And so I could match the IP's to the numbers of the PI's. So x.x.x.51 would be k3s01, aso.
So here are the six easy commands for my k3s setup:
k3sup install --ip 192.168.0.51 --user dietpi --cluster --k3s-extra-args '--write-kubeconfig-mode=644'
k3sup join --ip 192.168.0.52 --user dietpi --server --server-ip 192.168.0.51 --server-user dietpi --k3s-extra-args '--write-kubeconfig-mode=644'
k3sup join --ip 192.168.0.53 --user dietpi --server --server-ip 192.168.0.51 --server-user dietpi --k3s-extra-args '--write-kubeconfig-mode=644'
k3sup join --ip 192.168.0.54 --user dietpi --server-ip 192.168.0.51
k3sup join --ip 192.168.0.55 --user dietpi --server-ip 192.168.0.51
k3sup ready --context default
I downloaded the k3sup on my mac mini (late 2014 model), which I also equipped with helm and kubectl. But before I could execute the commands I had to do some preparations.
As you might have spotted I used the default non-root user "dietpi". And since I use k3sup on mac, I have to configure all 5 Pi's for remote access via ssh. So I used the trusty old command "ssh-copy-id", again.
ssh-copy-id -i ~/.ssh/id_rsa.pub dietpi@192.168.0.51
ssh-copy-id -i ~/.ssh/id_rsa.pub dietpi@192.168.0.52
ssh-copy-id -i ~/.ssh/id_rsa.pub dietpi@192.168.0.53
ssh-copy-id -i ~/.ssh/id_rsa.pub dietpi@192.168.0.54
ssh-copy-id -i ~/.ssh/id_rsa.pub dietpi@192.168.0.55
After verification that the command "ssh dietpi@<k3sMachineIp>" worked, I could execute the k3sup commands. And after copy/paste adjust I had a running k3s cluster. Very easy and simple.
Ok, so what do the k3sup commands do?
So for the servers .51-.53 are control plane nodes, .54 and .55 are worker nodes. To start a new cluster you have to use these k3sup arguments:
install --> For installation of the new cluster
--ip x.x.x.x --> The IP of the 1st control-plane node
--cluster --> To signal you will add more control-plane nodes
--user dietpi --> What user to use for remoting into the server
--k3s-extra-args '--write-kubeconfig-mode=644' --> With this you can change the access mode for the generated "kubeconfig"; I'm not sure if the problem I had last year, with access problems, still exists, but this solved it and I thought it couldn't hurt.
For the other control-plan nodes you have to use these arguments:
join --> Signals that you join an existing cluster
--ip 192.168.0.xx --> What server to join
--user dietpi --> What user to use for remoting
--server --> The role the new server should use
--server-ip --> The IP of the first control-plane node
--server-user --> The user to use for remote into the server
----k3s-extra-args '--write-kubeconfig-mode=644' --> With this you can change the access mode for the generated "kubeconfig"; I'm not sure if this is needed for additional control-plane nodes, but I left it there.
And at last, to join some simple worker nodes, you have to use these arguments:
join --> Signals that you join an existing cluster
--ip 192.168.0.xx --> What server to join
--user dietpi --> What user to use for remoting
--server-ip --> The IP of the first control-plane node
And with the final command "k3sup ready --context default" you can extract the kubeconfig for the local ~/.kube/config.
After adding the new config to the .kube/config on my main mac, and switching the context to the new k3s cluster, the kubectl should work. But of course it didn't. Ja, you are right, usually, you get a kubeconfig with 127.0.0.1. So moving a kubeconfig to a machine would not work without adapting the ip.
But since I now have 3 k3s servers, what IP to pick? After I did an hour's research I figured out, I need a load balancer. But my FritzBox does not have a load-balancing setting. Nor does the pi-hole software. It has DNS, but no load balancing. So I did the next best thing I know. Using nginx. I installed it quickly on my monitorpi, googled how to do a load balancing config for nginx.
user  nginx;
worker_processes  auto;

error_log  /var/log/nginx/error.log notice;
pid        /var/run/nginx.pid;


events {
    worker_connections  1024;
}

stream {
    upstream k3s {
        server 192.168.0.51:6443;
        server 192.168.0.52:6443;
        server 192.168.0.53:6443;
    }

    server {
        listen 6443;
        proxy_pass k3s;
    }

    upstream k3s_ssh {
        server 192.168.0.51:22;
        server 192.168.0.52:22;
        server 192.168.0.53:22;
    }

    server {
        listen 22;
        proxy_pass k3s_ssh;
    }
}
As you see, I had not only to load balance the usual 6443 port for the k8s api, also port 22 needed to be load balanced. I'm not sure why, but it was suggested in one of the load balancing articles.
So quickly added a kubernetes.local setting to pi-hole dns, with the IP from monitorpi. And now I was ready to fix the .kube/config on my main mac to that IP and voila, kubectl was working. And helm worked to.
kubectl get nodes -o wide
NAME    STATUS   ROLES                       AGE   VERSION        INTERNAL-IP    EXTERNAL-IP   OS-IMAGE                         KERNEL-VERSION   CONTAINER-RUNTIME
k3s01   Ready    control-plane,etcd,master   33d   v1.25.5+k3s2   192.168.0.51   <none>        Debian GNU/Linux 11 (bullseye)   5.15.84-v8+      containerd://1.6.14-k3s1
k3s02   Ready    control-plane,etcd,master   33d   v1.25.5+k3s2   192.168.0.52   <none>        Debian GNU/Linux 11 (bullseye)   5.15.84-v8+      containerd://1.6.14-k3s1
k3s03   Ready    control-plane,etcd,master   33d   v1.25.5+k3s2   192.168.0.53   <none>        Debian GNU/Linux 11 (bullseye)   5.15.84-v8+      containerd://1.6.14-k3s1
k3s04   Ready    <none>                      33d   v1.25.5+k3s2   192.168.0.54   <none>        Debian GNU/Linux 11 (bullseye)   5.15.84-v8+      containerd://1.6.14-k3s1
k3s05   Ready    <none>                      33d   v1.25.5+k3s2   192.168.0.55   <none>        Debian GNU/Linux 11 (bullseye)   5.15.84-v8+      containerd://1.6.14-k3s1
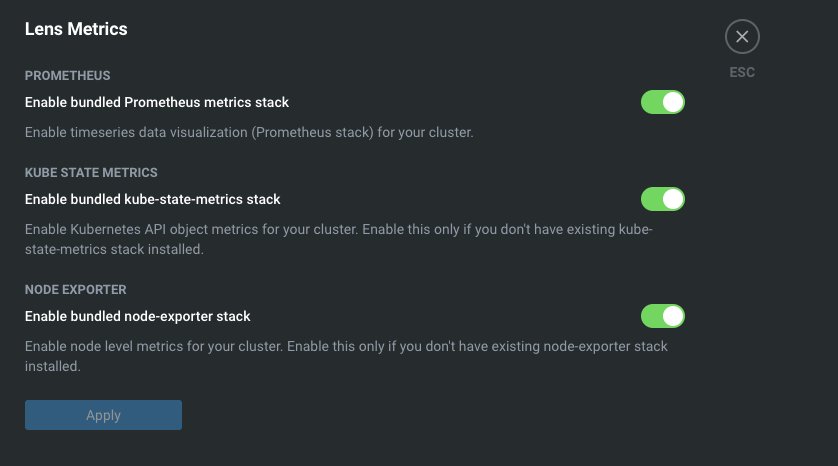
So as a final step, to prepare my k3s cluster for starting to get workloads, was to configure lens.app. Add it was a breeze. Simply download it, run it and select the cluster (.kube/config is used) you want to open and you're done.
I only had to enable the Lens Metrics and wait for a few minutes and lens was ready to help me transfer my applications.
But that's a story for the next blog...
As always apply this rule: "Questions, feel free to ask. If you have ideas or find errors, mistakes, problems or other things which bother or enjoy you, use your common sense and be a self-reliant human being."
Have a good one. Alex